Tuesday, 19 May 2020

Send Email using PowerShell script

Windows PowerShell is a Windows command-line shell designed for system administrators. We can use Send-MailMessage cmdlet to send an email from PowerShell using SMTP protocol.

Copy below script in notepad, change required parameter and save it as SendMail.ps1

[System.Net.ServicePointManager]::SecurityProtocol = 'Tls,TLS11,TLS12'
$From = "Sender email address"
$To = "recipient’s email address"
$Cc = "cc recipient’s email address"
$Subject = "Your Subject"
$Body = "Message Body"
$SMTPServer = "SMTP Server address"
$SMTPPort = "SMTP Server port"
Send-MailMessage -From $From -to $To -Cc $Cc -Subject $Subject -Body $Body -SmtpServer $SMTPServer -port $SMTPPort -UseSsl -Credential (Get-Credential)

Post saving file, Open PowerShell and run command .\SendMail.ps1


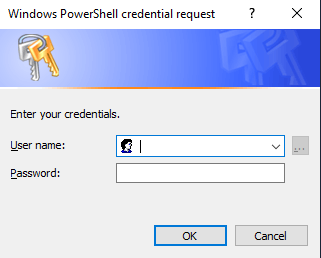
It will prompt you for the login credentials.


Note : 

- This script is 100% working with gmail. You must enable less secure app or need to create app password to use this script.

How to enable less secure App in Gmail. - Click Here.
How to create App Password in Gmail. - Click Here.


Tuesday, 12 May 2020

How to install CentOS 7

CentOS media is available on centos.org. Please watch the below video to install CentOS 7.


Tuesday, 31 December 2019

Change the remote desktop port on server/desktop

RDP(Remote Desktop Protocol) is a proprietary protocol developed by Microsoft. When you connect the computer, the remote desktop feature  "listen" the connection request by default on port 3389.

You can change the RDP listening port on Windows computers/servers by modifying the registry. Use the below steps to change the default RDP port.
  • Start the registry editor (Type regedit in the Search box.) or type regedit in Run and click on OK.
  • Navigate to the following registry subkey:
HKEY_LOCAL_MACHINE\System\CurrentControlSet\Control\Terminal Server\WinStations\RDP-Tcp\PortNumber
  • Click Edit > Modify, and then click Decimal
  • Type the new port number above 1024, and then click OK. 
  • Close the registry editor, and restart your computer/server.
After a restart, you may connect using the new RDP Port. If the firewall is running, make sure to configure your firewall to allow connections to the new port number. 

To connect the RDP using the new port, you need to enter IPADDRESS:PORT in computer address.

For security reasons, it's better to change the default RDP port and whitelist the IP address in your firewall for the RDP connection.


Thursday, 23 May 2019

How to set a Static IP Address on CentOS-7

When you install the CentOS, IP Address set to dhcp mode. The configuration file for the network interfaces located at directory /etc/sysconfig/network-scripts. 

To list the network interfaces you need to type the following command:
~]$ ip a


DHCP Configuration for ens33 stored in file ifcfg-ens33 and the same is located at directory /etc/sysconfig/network-scripts/. It's look like below.

TYPE=Ethernet
PROXY_METHOD=none
BROWSER_ONLY=no
BOOTPROTO=dhcp
DEFROUTE=yes
IPV4_FAILURE_FATAL=no
NAME=ens33
UUID=d28f4e88-c167-4b78-b918-7b6e55c775e2
DEVICE=ens33
ONBOOT=yes

There are two method to Configure static IP address on ens33.

Method 1 : 
To configure a static IP address on ens33 using ifcfg file, edit file ens33-ifcfg using vi editor. File ens33-ifcfg is located at directory /etc/sysconfig/network-scripts/
~]$ vi /etc/sysconfig/network-scripts/ifcfg-ens33
Update file ifcfg-ens33 as per below

TYPE=Ethernet
PROXY_METHOD=none
BROWSER_ONLY=no
BOOTPROTO=none
DEFROUTE=yes
IPV4_FAILURE_FATAL=no
NAME=ens33
UUID=d28f4e88-c167-4b78-b918-7b6e55c775e2
DEVICE=ens33
ONBOOT=yes
IPADDR=172.16.16.2
PREFIX=16
GATEWAY=172.16.16.1
DNS1=8.8.8.8

Save and closed the file. Static IP Address configuration will be applied after network service restart or manually making interface down and up. You may use below command for network service restart.
~]$ systemctl restart network
To down and up network interface use below command
~]$ ifdown ens33
~]$ ifup ens33
Method 2 :
You may also configure static IP Address using NetworkManager text user interface (TUI) tool. nmtui, provides a text interface to configure networking by controlling NetworkManager.

If  NetworkManager-tui is not install, issue the following command as root:
~]# yum install NetworkManager-tui
To start nmtui, issue a command as follows:
~]$ nmtui
after using nmtui command, The text user interface appears. To navigate, use the arrow keys or press Tab to step forwards and press Shift+Tab to step back through the options. Press Enter to select an option and use Space bar toggles the status of a check box.

To set static IP address on ens33 using nmtui use below command.
~]$ nmtui edit ens33
Below windows will be open after above command