Thursday, 23 May 2019

How to set a Static IP Address on CentOS-7

When you install the CentOS, IP Address set to dhcp mode. The configuration file for the network interfaces located at directory /etc/sysconfig/network-scripts. 

To list the network interfaces you need to type the following command:
~]$ ip a


DHCP Configuration for ens33 stored in file ifcfg-ens33 and the same is located at directory /etc/sysconfig/network-scripts/. It's look like below.

TYPE=Ethernet
PROXY_METHOD=none
BROWSER_ONLY=no
BOOTPROTO=dhcp
DEFROUTE=yes
IPV4_FAILURE_FATAL=no
NAME=ens33
UUID=d28f4e88-c167-4b78-b918-7b6e55c775e2
DEVICE=ens33
ONBOOT=yes

There are two method to Configure static IP address on ens33.

Method 1 : 
To configure a static IP address on ens33 using ifcfg file, edit file ens33-ifcfg using vi editor. File ens33-ifcfg is located at directory /etc/sysconfig/network-scripts/
~]$ vi /etc/sysconfig/network-scripts/ifcfg-ens33
Update file ifcfg-ens33 as per below

TYPE=Ethernet
PROXY_METHOD=none
BROWSER_ONLY=no
BOOTPROTO=none
DEFROUTE=yes
IPV4_FAILURE_FATAL=no
NAME=ens33
UUID=d28f4e88-c167-4b78-b918-7b6e55c775e2
DEVICE=ens33
ONBOOT=yes
IPADDR=172.16.16.2
PREFIX=16
GATEWAY=172.16.16.1
DNS1=8.8.8.8

Save and closed the file. Static IP Address configuration will be applied after network service restart or manually making interface down and up. You may use below command for network service restart.
~]$ systemctl restart network
To down and up network interface use below command
~]$ ifdown ens33
~]$ ifup ens33
Method 2 :
You may also configure static IP Address using NetworkManager text user interface (TUI) tool. nmtui, provides a text interface to configure networking by controlling NetworkManager.

If  NetworkManager-tui is not install, issue the following command as root:
~]# yum install NetworkManager-tui
To start nmtui, issue a command as follows:
~]$ nmtui
after using nmtui command, The text user interface appears. To navigate, use the arrow keys or press Tab to step forwards and press Shift+Tab to step back through the options. Press Enter to select an option and use Space bar toggles the status of a check box.

To set static IP address on ens33 using nmtui use below command.
~]$ nmtui edit ens33
Below windows will be open after above command


Thursday, 21 September 2017

How to find Wi-Fi password

You can find WiFi password on windows computer of currently connected WiFi network or previously connected WiFi network.

You can find the connected WiFi password using "Network and Sharing Center" or "using command prompt".

Using Network and Sharing Center

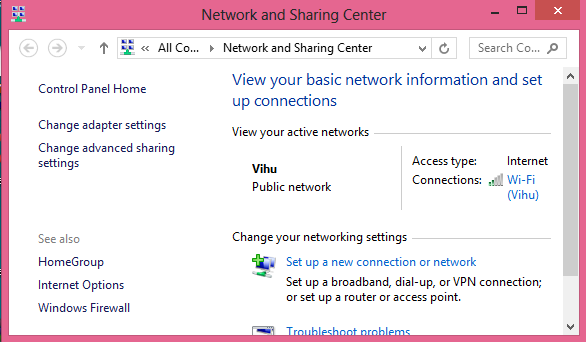
You may open Network and Sharing center by going into control panel. You can easily do this by right click on Wireless Network icon in taskbar and click on "Open Network and Sharing Center".


Now click on connected WiFi.


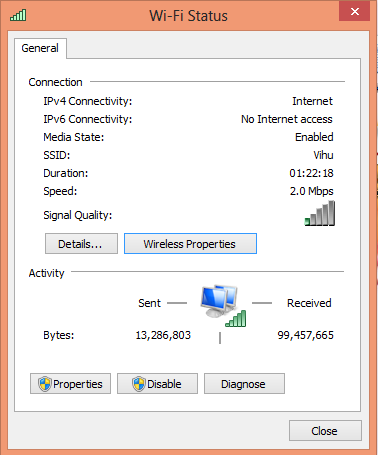
Click on "Wireless Properties" in "Wi-Fi Status" Window.


Click On the "Security" Tab and enable the "Show Characters (Check Box)" to view the password.


Using Command Prompt

Using command prompt you may able to find any previously connected WiFi password.
You need to open command prompt with admin rights. Then Type below command.


  netsh wlan show profiles

It will list the all previously connected WiFi network. To find the password of particular profile type below command with replacing the profilename with profile.


  netsh wlan show profile name=profilename key=clear

Above command list all setting related to particular profile. Look for the "key content" to find the WiFi password for selected WiFi Network.

Saturday, 20 May 2017

Action to be taken to avoid WannaCry ransomware

Most of people are aware about The WannaCry Ransomware Attack. Rasmoware will encrypt your files and make them inaccessible and demand a ransom payment to decrypt them. 

The ransomware, known by the names “WCry”, “WannaCry” and “WannaCryptor”, targets a vulnerability in Windows SMB service that was patched in Microsoft bulletin MS17-010 in March this year. Once WannaCry enters a network, it can spread around to other computers on that same network, a typical trait of ransomware that maximizes the damage to companies and institutions.
WannaCry has infected more than 100 countries, bringing essential businesses to a halt. It is the biggest coordinated cyber attack of its kind, impacting numerous organisations.  

Prevention is the best option to avoid such a attacks. I have listed below precaution to avoid such a attacks.
  • Patched your system/server with microsoft MS17-010 update.
  • Block the TCP port 445, 137, 138, 139 in firewall.
  • Make sure you system is updated with latest antivirus definitions.
  • Don’t open any mail in Spam or Mail which has come from Unknown Source.
  • Download software only form OEM site.
  • Turn on protected file sharing.
  • Block the TCP port 445, 137, 138, 139 in firewall.
  • Disable autorun (USB/USB).
  • Turn on popup blocker in browser.
  • Avoid giving unnecessary administrative rights to user.
For more information you may visit below sites.


Saturday, 7 January 2017

Install .NET framework 3.5 in windows 10 - Offline Method

Some application requires .net framework 3.5 to work. By default .net 3.5 framework is not install on your system. But user gets error while trying to install .net 3.5 framework from control panel using "Turn on or turn off windows feature" or some application try to download this features online and gets error due to poor internet connection.

To overcome this problem, windows has feature call Deployment Image Servicing and Management (DISM.exe) by using this you may install .net 3.5 framework. To use this feature you need the Windows 10 OS media.

To install net 3.5 framework using DISM.exe, follows below steps.
  1. Open Command Prompt as administrator. You may do this by  click All Programs, and then click  Accessories, Right-click Command prompt, and then click Run as administrator. If UAC dialog box appears then click on Yes to confirm.
  2. Now write below in cmd.


  Dism /online /enable-feature /featurename:NetFX3 /All /Source:DriveLater:\sources\sxs /LimitAccess

Where DriveLater is latter which windows assign to your windows 10 OS media.